Connect/Gateway panel guide: Kentec Taktis
Overview
Nimbus supports connection to the Taktis panel either via a direct ethernet to ethernet connection ("Direct Network"), or an ethernet connection via the sites network infrastructure ("LAN").
Both methods require Taktis Media Gateway (Kentec Part No. K794)
Taktis Monitoring for Media Gateway
We strongly recommend updating the firmware for the Taktis panel EN-00.12.R114 or later.
You can then make the following changes to the Taktis Media Gateway.
- Set Monitoring Period to 60 seconds
- Set Grace Period to 30 seconds
Please refer to the Taktis manual or contact Kentec Technical Support for details on how to complete this step. Failure to do this, may result in frequent faults on the panel.
Taktis Firmware
Please ensure both the Panel and Media Gateway are updated to the latest available firmware versions. Contact techsupport@kentec.co.uk for updates & support regarding the Panel and Media Gateway.
Connection via Direct Network
Required components
From Nimbus
- A Nimbus Connect or Fixed Gateway device.
From the panel manufacturer/3rd party
- Kentec Taktis 'Media Gateway' (part number K794).
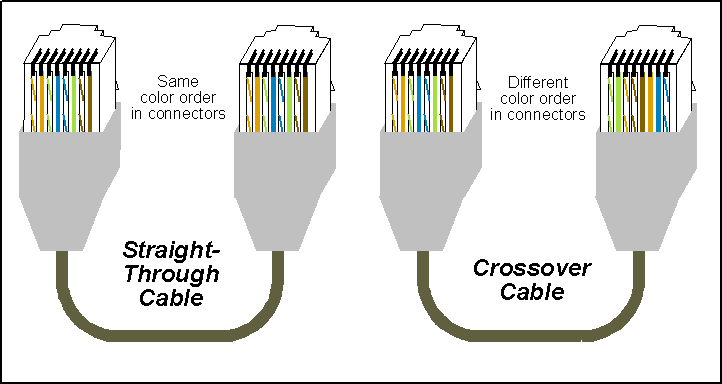
- Ethernet 'crossover' network cable.
Do not use an Ethernet 'patch' cable (straight through). Check your Ethernet crossover cable has a different sequence of colours on either end of the cable.

Physical connections
Plug the ethernet crossover cable into the ethernet port of the Nimbus device, and ethernet port of the Taktis Media Gateway.
Check for a solid green light on the left-hand side of the ethernet ports. If no light, check the cable is actually a crossover cable and not a conventional ethernet cable.
Configure the Taktis Media Gateway
Configure the Taktis Media gateway with the following IP details. Refer to the manufacturer's installation & commissioning documentation on how to do this.
- I.P. Address to 192.168.1.1
- Sub Net Mask to 255.255.255.0
- Default Gateway to 0.0.0.0 (not to be confused with the Nimbus Gateway IP)
- DNS Server to 0.0.0.0
Configure the Nimbus Web Portal & Connect/Fixed Gateway
Nimbus Connect is configured via the Nimbus Digital App available on the Google Play Store and Apple App Store.
Fixed Gateways are configured using the Fixed Gateway Configuration Tool with the Fixed Gateway connected to your laptop via a mini USB cable. Follow links for guidance on installing and using this tool.
Configure the Nimbus Connect/Fixed Gateway with the following details.
- Address mode to STATIC
- IP Address to 192.168.1.2
- Subnet Mask to 255.255.255.0
- Default Gateway to 0.0.0.0
- DNS1 to 0.0.0.0
Login to the Nimbus Web Portal and edit the Active Equipment as below.
- Taktis Media Gateway IP to 192.168.1.1
- Taktis Media Gateway Port to 100
![]()
Connection via LAN
Required components
From Nimbus
- A Nimbus Connect or Fixed Gateway device.
- 3 core screened data cable.
From the panel manufacturer/3rd party
- Kentec Taktis 'Media Gateway' (part number K794).
- 2x ethernet cables.
Physical connections
Plug an ethernet cable into the ethernet port of the Nimbus device, and connect to the site supplied RJ45 port. Plug the remaining ethernet cable from the site supplied RJ45 port to the Taktis Media Gateway.
Check for a solid green light on the left-hand side of the Ethernet ports. If no light:
- Check both cables are an ethernet patch ('straight through') cable.
- Check with IT dept. that the port is active.
- Check both ports are on the same network and/or VLAN.
Configure the Taktis Media Gateway & Nimbus Connect/Fixed Gateway
If the ethernet network supports DHCP, then both the Nimbus Connect/Fixed Gateway and Taktis Media Gateway will automatically receive and IP address.
Be aware this may cause communications issues between the Nimbus Connect/Fixed Gateway and Taktis Media Gateway if the I.P address changes over time. You should request IT or the network manager configures a 'Static Mapping' where the units are allocated the same IP address every time.
If the ethernet network does not support DHCP (sometimes referred to as static or fixed IP addressing) then configure the IP Address, Subnet Mask, Default Gateway, and DNS1/2 to the values as provided by the local IT dept on both the Taktis Media Gateway & Nimbus device.
The DHCP mode of the Nimbus device should be set to STATIC.
Nimbus Connect is configured via the Nimbus Digital App available on the Google Play Store and Apple App Store.
Fixed Gateways are configured using the Fixed Gateway Configuration Tool with the Fixed Gateway connected to your laptop via a mini USB cable. Follow links for guidance on installing and using this tool.
