
Overview
Nimbus supports connection to the ZP2/ZP2-A panel either via a direct ethernet to ethernet connection ("Direct Network"), or an ethernet connection via the sites network infrastructure ("LAN").
Required components
From Nimbus
- A Nimbus Connect or Fixed Gateway device
From the panel manufacturer/3rd party
- Ziton RMSDK PAK (Part No. 2010-2-PAK-RMSDK)
and
- 1x ethernet 'crossover' cable if using the "Direct Network" method
or
- 2x ethernet 'straight through' cables if using the "LAN" method
Note: an ethernet crossover cable has a different sequence of colours on either end of the cable versus a straight-through.
Configure the panel
- Select Panel from main menu
- Select Communications
- Select TCP/IP
- Configure the IP details below, according to the connection method, before selecting F4 to enter, F1 to go back, then F1 to save.
| Field | Direct Network | LAN |
| IP Address | 192.168.104.140 | As supplied by IT dept |
| Subnet Mask | 255.255.255.0 | |
| Default Gateway | 0.0.0.0 | |
| DNS Server | 0.0.0.0 | |
| Port | 2505 | 2505 |
To confirm the PAK code has been applied to the Panel, log into the Panel with an Installer code and access the Main Menu, scroll down to Reports, and then scroll down to and select "PAK List". The list will confirm the PAK's registered on the Panel.
Configure the Nimbus Web Portal & Connect/Fixed Gateway
Nimbus Connect is configured via the Nimbus Digital App available on the Google Play Store and Apple App Store.
Fixed Gateways are configured using the Fixed Gateway Configuration Tool with the Fixed Gateway connected to your laptop via a mini USB cable. Follow links for guidance on installing and using this tool.
Configure the Nimbus Connect/Fixed Gateway with the following details according to the connection method you are using.
| Field | Direct Network | LAN |
| Address Mode | STATIC | STATIC |
| IP Address | 192.168.104.141 | As supplied by IT dept |
| Subnet Mask | 255.255.255.0 | |
| Default Gateway | 0.0.0.0 | |
| DNS Server | 0.0.0.0 | |
| Port | 2505 | 2505 |
Login to the Nimbus Web Portal and edit the Active Equipment as below according to the connection method you are using.
| Field | Direct Network | LAN |
| Ziton ZP2 Gateway IPv4 | 192.168.104.140 | As supplied by IT dept |
| Ziton ZP2 Gateway Port | 2505 | 2505 |
| ZP2 Pin Code | 1234 | 1234 |
Ensure the panel number configured in the portal matches the panel number Nimbus is communicating with.
Physical connections
Direct Network
Plug the ethernet crossover cable into the ethernet port of the Nimbus device, and ethernet port of the panel.
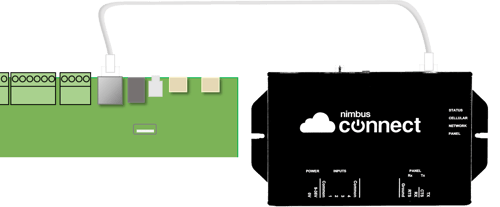
Check for a solid green light on the left-hand side of the ethernet ports. If no light, check the cable is actually a crossover cable and not a conventional ethernet cable.
LAN
Plug an ethernet cable into the ethernet port of the Nimbus device, and connect to the site supplied RJ45 port. Plug the remaining ethernet cable from the site supplied RJ45 port to the panel.
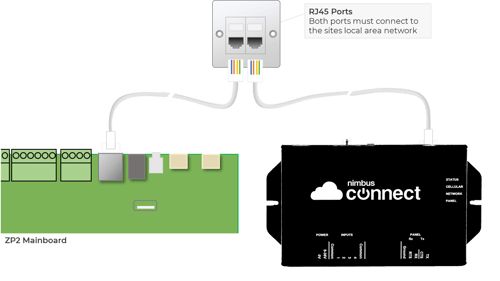
Check for a solid green light on the left-hand side of the Ethernet ports. If no light:
- Check both cables are an ethernet patch ('straight through') cable.
- Check with IT dept. that the port is active.
- Check both ports are on the same network and/or VLAN.
- Port 2505 is not restricted by ACL's, internal Firewalls, or other restrictions.